Tray Icon Settings
To view the current tray icon settings for a computer or group of computers, click on the "Remote Support" tab, then select "Tray Icon". At the top of the page is a "Computer/Group" selector, which lets you select the computer or group whose settings you wish to edit. Click on the "Change" button to select a computer or group.
Overview
The OptiTune Support Center is a local application that can run on each managed computer, and it gives end users various support options in requesting help from their administrator. It is fully customizable and brand able, even its desktop icon and task tray icon can be customized.
Typically the Support Center application is accessed by a desktop icon like the following:
![]()
It can also be accessed via a task tray icon in the lower right corner of the desktop screen:

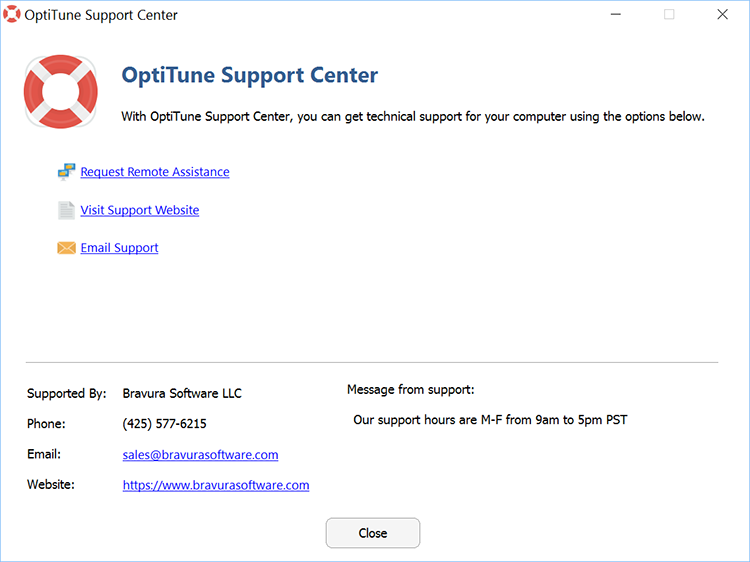
When the user double clicks on this desktop shortcut, the Support Center application opens:

All of the text in this application, including the icons can be customized. Defaults are automatically created for you based on your organization's contact details. When the end user clicks on one of the links in the middle of the application, the support action configured by the administrator is executed. The support actions themselves are also configured by the administrator, and their names and order shown are also configurable.
Importantly, the OptiTune Support Center is the only way for an end user to initiate a remote assistance request. Unless the support center application is enabled, and the "Remote Assistance" support action is specified, users won't be able to create remote assistance requests.
Support Center Tray Icon
To enable the Support Center application for the computer or group of computers selected at the top of this screen, select "Enabled" for the "Tray Icon" parameter, otherwise select "Disabled".
Support Center Content
If the Support Center Tray Icon is enabled, you can configure the support center application content in this section. Press the "Clear All" button to clear all the fields, and the "Load Defaults" button to load customized defaults based on your organization's information.
Enter the following fields:
Title - The title used in the Support Center application, both in the title bar of the application, large blue text in the main screen of the application, and as the task tray icon tool tip (mouse over the tray icon to see the tooltip).
Description - The second line of text in the support center application, shown above.
Supported By - The name of the organization or person supporting the end user
Website - The main support website for the user to visit, if any
Email - The primary technical support email for the end user to use, if any
Phone - The primary technical support phone number to contact, if any
Notes - any notes you wish to provide to the end user, such as support hours. Up to 4000 characters are supported, and scroll bars will be shown in the application.
Desktop Shortcut Name - enter the name of the shortcut on the user's desktop for the support center application. If left blank, no desktop icon will be created.
Icon - select either the default icon, or choose to upload your own ".ico" file. Custom ".ico" files need to include the following icons: 16x16, 32x32, 64x64 and 256x256 icons, all in 32-bit color.
Support Actions - select which support actions are available to the end user. Press the small "Edit" button to modify the support actions
Save Changes
Once you have finished making your changes, press the "Save Changes" button at the bottom of the screen to save your changes. Changes to the support center application will be reflected when the user next logs in to his or her computer.